
Categories
Scratch projects are made by putting blocks from 9 different categories together. Let’s take a look at the blocks:

Below, I will go over each category of blocks in general to provide a good starting point. You can find more details about each block as we start to use them in our creations.
If after this section, you want more details on each block before we dive into our 1st project, you can find this at https://en.scratch-wiki.info/wiki/Blocks.
Quick Look -In Editor
This video gives a quick look a the blocks in the Scratch editor. Below I explain them in much more detail.
Motion
In a Scratch project, we can use a brilliant selection of objects/characters called Sprites. From bananas to bugs, guitars to glasses, letters to lions. Depending on what we are building, we may want to move our sprite!
Motion deals with: moving, turning, point in a direction, change position by a set value, check if sprite is on edge & setting sprite rotation.
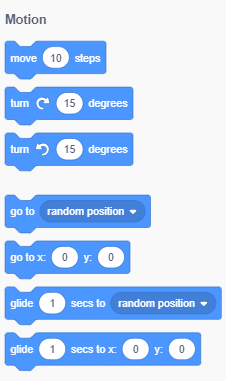
(see Scratch for a complete overview of motion blocks)
Looks
In our Scratch project we can control the look of our sprites, and the background (called ‘backdrop‘). Some sprites come with more than one image in its sprite costume section. A costume is the original sprite but with some differences, maybe a different colour, or maybe with legs in a different position. Why?
Well… have you ever seen a flip book? A flip book has an image on each page, and as you flick through the book, the image appears to be moving! To make a sprite look like its moving, we change the costumes to give the impression of movement. Making a unicorn gallop, candles on a cake get blown out, make a sprite appear to be dancing, make something grow or shrink, & more!
We will actually move a sprite to a new position on the screen when making our creation. But visually, we want to express movement by how the sprite looks. Why? …well, a moving unicorn with its hooves always in the same place while moving will look less impressive! So, just like a flip book, we flip though the unicorns costumes to give the look of the moving hooves.
Looks deals with: speech bubbles for sprites, thinking bubbles for sprites, switch costume, switch backdrop, change sprite size, changing sprite colour, show/hide sprite from the screen, change if a sprite is on top of another.
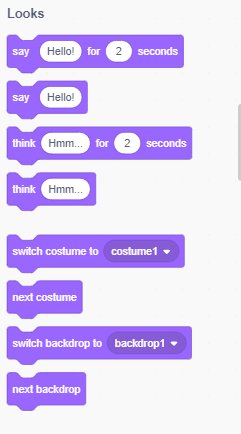 (see Scratch for a complete overview of looks blocks)
Sound
You may want to have sound in your Scratch project. Scratch comes with a library of sounds including animals, effects, loops, notes, percussion, space, sports, voice & wacky. If your computer has a microphone you can even record your own sounds!
Maybe you want some music to play at the start of the game, clapping at the end, maybe a pop sound if you click on a balloon, or a guitar to play some music. Adding sound makes creations more fun.
Sound deals with: Play a sound, stop sounds, changing pitch of a sound, set volume of sound.

Events
Events are a key part of any Scratch project, among events is the start/go event, to play our creation. Such events tell us that our project has reached a point we want something to happen, a trigger to do something. Scratch call such blocks ‘hat blocks’, they start a script.
Have you ever taken part in a school play? In a school play, we know when it is our turn to speak because we know who goes before us. Maybe we are first, so when the show has started it’s our turn straight away. Maybe after the second song it’s our turn to speak. A teacher could hold up a piece of paper with a name written on it in big letters, this would tell us whose turn it is next. The timing, the action of holding this paper up, would be an example of a trigger. When the paper was held up it would ‘broadcast‘ the message (name) to tell the class whose turn it was next.
Events deals with: Code to begin with when go (start flag icon) is clicked, trigger when a particular key is pressed, trigger by a value being reached, send out a message (broadcast) to another sprite to trigger code being run, receive a broadcast to trigger code to be run.
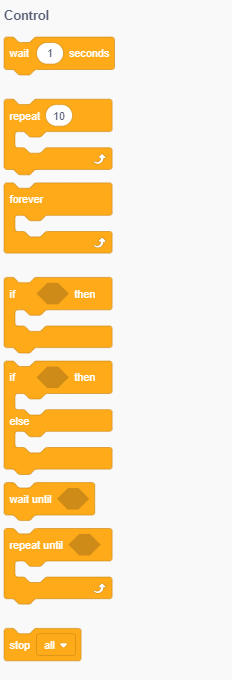
Control
Control blocks are a bit like a sports coach, they keep our activities in check, so that we know when to do different parts of our sports. A sports coach will tell us how many jumping jacks/ star jumps or push ups to do (& count down so we know when we have finished). In Scratch, control blocks give us the ability to loop through a block (or section of blocks) multiple times (a loop through).
Remember I said sprites can have multiple costumes, well, we can loop through the costumes pausing after each change, to give the effect of a galloping unicorn!
Control blocks could be a place bugs crop up. Bugs, are when our creation doesn’t quite work the way we intended it to. Every time we go though a loop, this is called an iteration. Sometimes we need something to happen a certain amount of times then do something else, but if we don’t loop through the blocks enough times we may create a bug!
Programming in Scratch gives us a choice of different loops, different rules for one iteration of a loop. These are repeat, forever, if-then, if-then-else, wait-until, repeat-until.
Control deals with: Making the project pause for a given number of seconds, repeat code block(s) for a given number of iterations, repeat forever loops, if-then/ if-then-else loops, wait-until / repeat-wait-until loops.
Sensing
Sensing blocks are super important, they detect when certain things happen in the scene, and to a sprite. When we want moving parts in our creation (maybe a sprite moving over the screen, a ball to hit a target, etc.) we can use sensing blocks to keep track of when a touch event has happened.
It is not just touching that can be sensed, the distance between sprites and the distance from a sprite to the mouse pointer (cursor) is also sensed. This means the mouses pointer (x and y positions) are known in this category. We will talk about x and y coordinates in the next post.
Sensing also allows for an easy way to ask the user a question and keep a copy of the answer so we can use it in our project.
With sensing we can sense the loudness of the microphone if you have a microphone on your computer.
Sensing deals with: Sense when sprites are touching each other/edge of stage/mouse point, sense x and y coordinates, microphone loudness, sense when keyboard key is pressed, a timer.
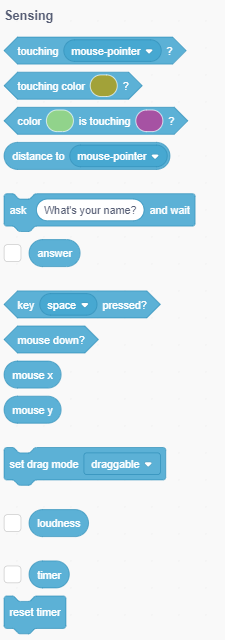
(see Scratch for a complete overview of sensing blocks)
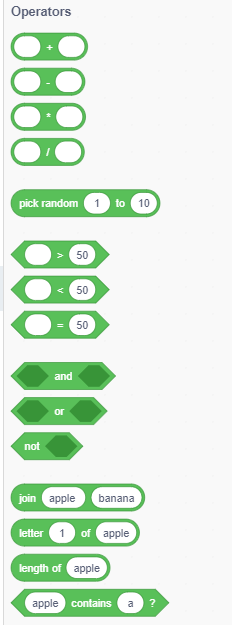
Operators
If you have begun maths class at school, you may already be familiar with some Scratch blocks…cool right!
A big part of operator blocks are to do with numbers. In maths class you may have see text like this:
- 2 + 2
- 2 * 2
- 2–3
- 2 /2
- 2>1
- 1<2
- 2=2
All these operators (+ * – > < =) can be very useful to us in our creations. Maybe you want to keep track of a players score, maybe you want to take away some points or add them, or maybe you want to pick a random number (create a dice in your game). As we make creations you will see the power of operators in programming!
As well as maths based operators, Scratch operators also do some cool things with text (called ‘strings‘ in programming).
Sometimes in our creation, it is useful to know one thing (a score is less than 5) and at the same time we also need to check a second thing at the same time (the player still has a turn left to continue playing the the game). This is called an ‘and‘ condition.
Sometimes we don’t want to check two things are a certain way, but just one thing – maybe we want to check whether one thing is true (for example there is still time left to play or there are still more magical gems to collect) this is called an ‘or‘ condition.
Finally we may just want to check if something is true or false. Just a true or false result is called a ‘boolean‘ (boolean statement or variable). Booleans are super useful in programming. If we were to make a maths game we can check whether 4+6 = 10 by using a boolean statement. For this example, the boolean statement is 4+6 = 10 , the boolean variable equals true.
If we made a game, we could check when our score reached 100 points to trigger the user winning the game!
Operators deals with: Mathematical operations (+ * – > < =), boolean statements, and/or/not condition, simple text based operations.
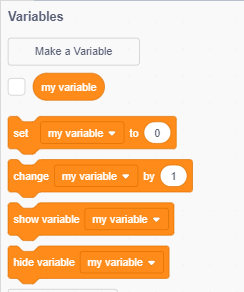
Variables
A variable is something we want to know about, it’s value could change or it could always be the same. Examples of variables in a game are player’s score, player name, number of lives, time, answers to a question and the question asked.
It may be useful to break down some variables into more easy to access chunks, for this we can use a list. Let’s say we wanted to make a hangman game, instead of storing the answer word (let’s say the word is hamburger), we could save the word as a list of letters to check if a letter guessed is in our list (list: h | a | m | b | u | r | g | e | r). Every time a player guessed a letter correctly, we could remove this letter from our list. Let’s say the user guessed h, a, m, g and e correctly – our list could shrink to just b | u | r | r . This way, we would know how many letters are still left to be correctly guessed. So, on the next turn we can answer the guess more quickly (as we don’t to check the whole list h | a | m | b | u | r | g | e | r but only the remaining guesses b | u | r | r
Variables deals with: number and text based variables, setting / changing/ showing/ hiding variables.
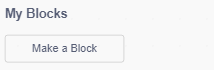
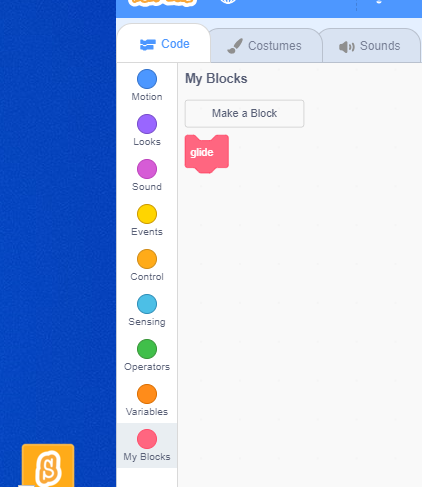
My Blocks
My blocks are super powerful. They let us create our own blocks, we can slot them into our creation when we need them. Instead of needing to connect a bunch of blocks every time we need them, we just use our ‘my blocks’ single block creation. Think of it as a a single block with superpower, because although we can use it as one block it’s super powers come from the bunch of blocks used within it (which we have pieced together).
Your own blocks make simple use of a bigger set of blocks. They can act differently depending on what values (variables) you use with them. In programming, this bunching together of blocks (steps) is called a ‘method‘ or ‘function‘. The variables we use in the method/ function are known as ‘arguments‘ or ‘parameters‘.
When we click ‘Make a Block’ you will see this pop-up window:
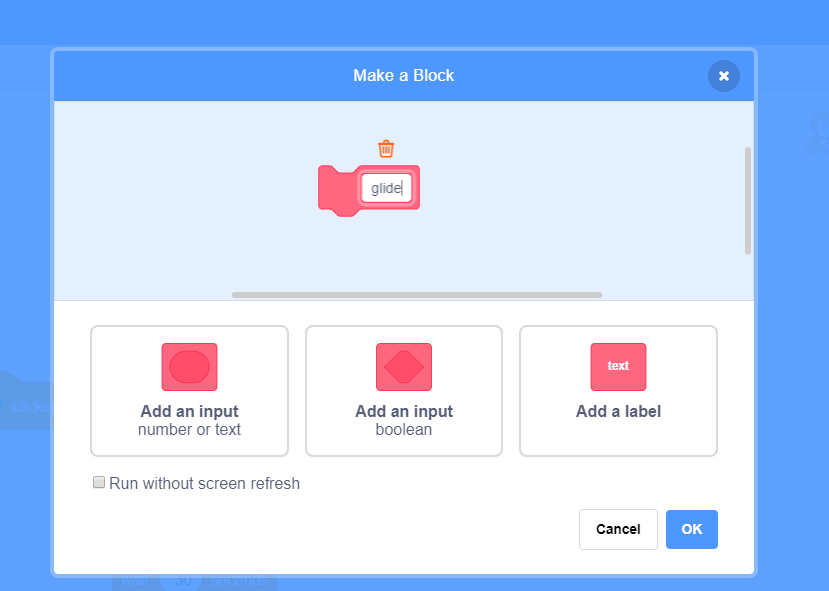
We can choose to add inputs or booleans to use in our block. These values will be given a the time we use the block. After we click OK on the pop up window, we can then give our block something to do!
Notice the label of our block includes the name of our block and the label ‘define ‘. We can now drag any blocks from the other categories onto our define block:
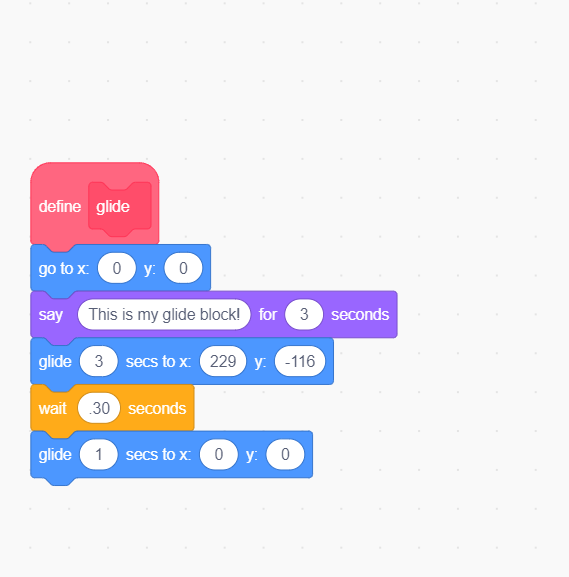
Once made, we can use our block. It will be shown in the My Block section: (one piece with our blocks name on it)
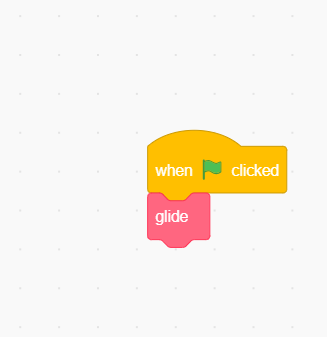
We grab that single block and use it where we want:
Do you see how many blocks were used in the define block under the define label? (see image ‘My Block – Picture 3’ above)? Did you count 5 plus the define label block?
It looks nicer (less busy) to see just 1 block on the screen when we use our block, instead of 5 blocks, right? My glide block is just 1 block but it has the superpower of 5 blocks ‘it knows/does’ ). Cool right!
My Blocks deals with: our own set of blocks we can easily reuse, add input of text/ number/ boolean as parameter to use in our block, reduce the number of blocks on screen by using my block (single block) when using them.
ICC Full Scratch Offering Overview
For an overview of this blog offering please click here!